Navigation Tests
In 2013, we introduced a new way of testing teams on their navigation skills.
Two legs on day one of the hike will be Navigation Tests, with a set route to be followed. The start and end points for these Navigation Tests are marked on the list of checkpoints as “NT Start” and “NT End” respectively. There will be no navigation tests on the day two route.
The idea is that teams must know how to use a map and compass effectively rather than relying entirely on route-learning or following the team in front of them.
Teams will not necessarily be taking the most direct route between these checkpoints, and not all teams will follow the same route. This will work as follows:
- Teams will be given their route on Saturday morning before starting the hike, as a series of 6-figure grid references. Samples are available on our website to help teams to prepare for this.
- Teams will then be allowed 10 minutes to plot this on their maps, without assistance from Leaders or Parents.
- Plotted routes will be checked and teams will receive a score for the quality and accuracy of their route plotting. The team will then be allowed to start the hike at their stated start time.
- Observation Markers will be placed along the route on the Navigation Legs only. Each will contain a code which the team will record and hand to the marshals at the next checkpoint for scoring.
- Time taken to walk Navigation Legs will be excluded from the team’s overall walking time.
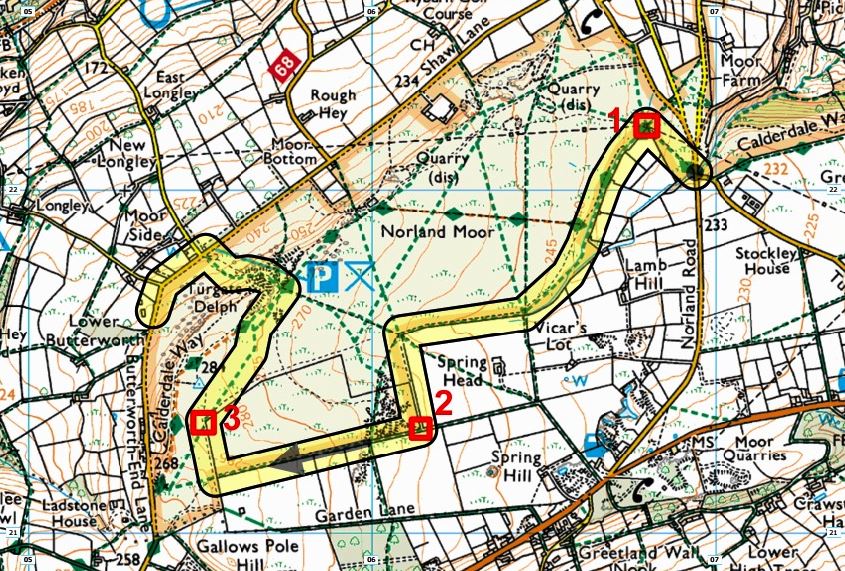
The route plans given to teams at St Paul’s on the Saturday morning will be similar to the one below. This example goes from Checkpoint 2 at Clough Moor Bridge to Checkpoint 3 at Norland Holiday Home.
Please note that this is only an example to help teams to familiarise themselves with the format, it will NOT form one of the actual navigation legs.
Leaders entering teams must ensure that their teams are comfortable doing the following:
- Plotting 6-figure grid references on their maps.
- Drawing in the route to be taken between these grid references, without hiding any of the map detail under their line.
- Using a compass to set their maps and take bearings to help them determine which path to take.
- Look ahead on the map for clues as to the next change of direction
Example Format of Route Plan for Brow Hike Navigation Tests
For Clough Moor Bridge to Norland Holiday Home leg:
- SE 069220 – Clough Moor Bridge
- SE 068221 – Point 1
- SE 061213 – Point 2
- SE 055213 – Point 3
- SE 053216 – Norland Holiday Home
The bold ones are the pre-published checkpoints – the italics ones are intermediate steps defining the particular route to be taken.
Teams will be given time to plot the points and draw in the route and this would be checked before the team are allowed to start.
The plotted route on the map should look like the one below: